Nexus-King Salhadaar Mythic Down!
Mythic Nexus King Saladbar Down!
Errm, sorry, Salhadaar, yes Salhadaar I meant 😛
What an absolute monstrosity of a fight… I definitely jinxed it in the last post when I said how quick this tier had been going. Four hundred pulls later, we finally got the bugger, but make no mistake, this boss almost beat us into a pulp.
The good news? I mean besides the kill, we learned a lot. Enough to share the practical tips and positioning tricks you simply won’t get from a generic guide.
Before jumping into the phases, let’s talk comp and general notes:
(At the end of the post I have also a links to my raid plans and cd allocation sheet in case you want to use them, feel free to copy them and tinker with them)
Raid Composition:
You need one Warlock for the intermissions. Other than that, run the usual 2 tanks / 4 healers / 14 DPS with a healthy melee–ranged mix.
Brewmasters are excellent here, they can solo-soak all spare Conquers. Not mandatory though; with externals, other tanks can also handle solo soaks.
If you are looking to get the most out of Brewmaster Monk for this fight, feel free to join our discord and speak with our main tank Athlios / Manshao.
DPS profile:
It is all about hitting the correct target (see platforms) and using cooldowns properly, not mindlessly blasting, inevitably this leads to a bit of a cooldown planning, nothing drastic though.
Assign CDs before you start serious pulls. There are two points where damage is absolutely required:
a) Platform phase:
There is a strict timer to kill the Titan and get back down. If you miss it, you wipe.
b) Burn phase:
This is your window to push the Dragon’s HP as low as possible before it feeds back to the boss. Everyone uses everything — CDs, pots, Bloodlust/Hero.
Rule of thumb: If you clear the platform without needing Pots or Lust and the boss is at 50% or below when you go up then your DPS is enough to kill the boss.
Below is our cooldown allocation if you want to reference it.

Generally, be patient. This fight is all about positioning and quick orientation in the room. Phase 1 is unforgiving, and most wipes will happen there.
If a couple of people die early, don’t wipe it instantly. Unless you can’t make the platform timer, use the pull to get some practice in the final phase and keep on learning the fight.
Last phase looks chaotic, but it’s structured — after a few attempts there, we were solid enough that once we reached it with everyone alive, the kill followed.
Phase 1
This is the phase where you’ll start questioning your life choices and wondering if it’s finally time to switch from WoW to The Sims. 😀
To keep the suffering to a minimum, remember three words:
Positioning, positioning, and positioning. The more disciplined you are with this, the easier your pulls will be.
Tips for Phase 1
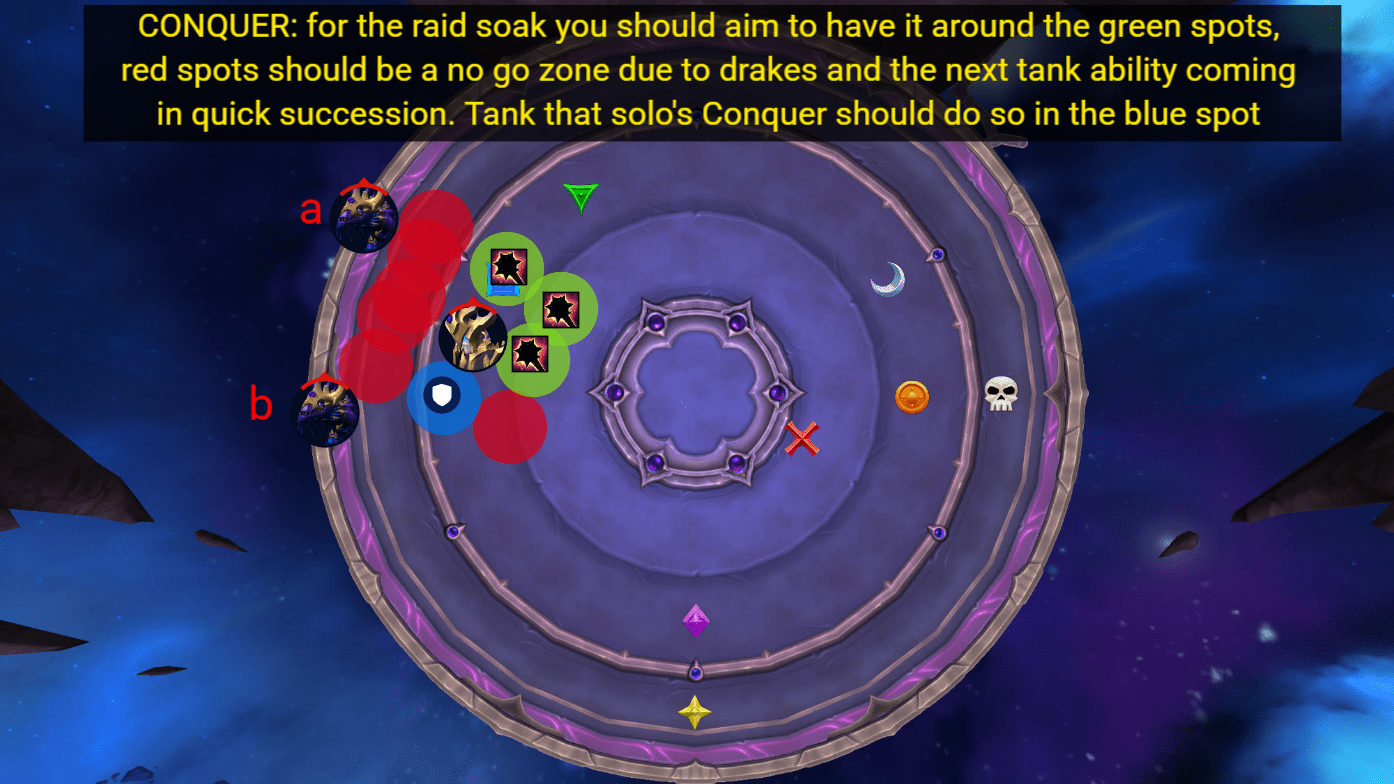
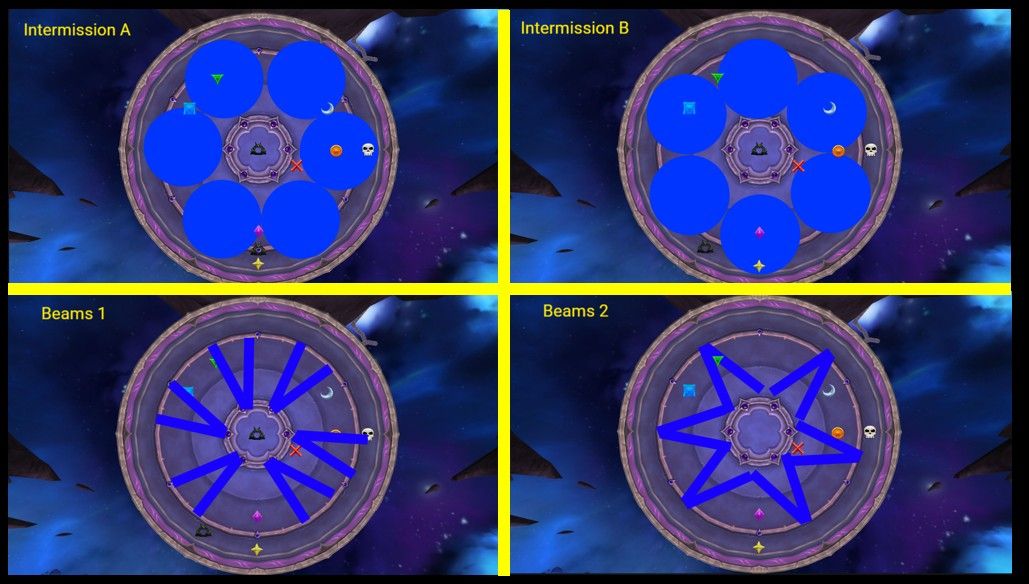
1) Beam control is everything.
The drake beams trigger from the boss’s position first and then aim toward the raid.
To force a clean and consistent sequence:
- Tank the boss slightly left of your marker.
- Have the raid stacked tightly on the boss.
Done correctly, you will always trigger Dragon A, then Dragon B, then the rest (see pic).
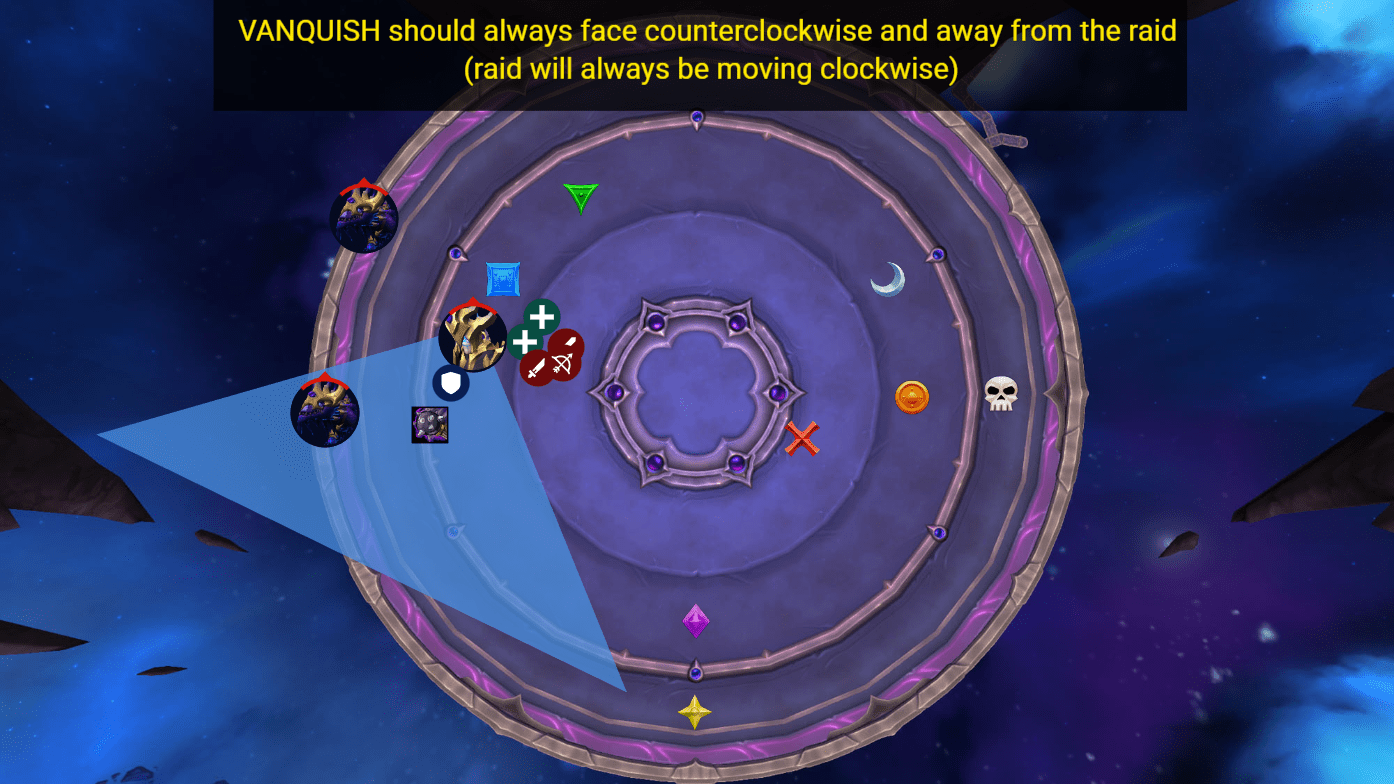
This is crucial for keeping a safe area if you need to soak immediately at the start of the Conquer → Vanquish sequence.

2) Assign movement buffs to every single soak.
Roars, Wind Rush, whatever you’ve got — make sure they’re assigned.
3) Stay away from the blue marker until it’s time to soak.
When dodging beams, avoid moving anywhere near the soak marker so you don’t accidentally bait beams there. Usually soaking happens on the blue marker but in a pinch you can use all the areas marked with green.
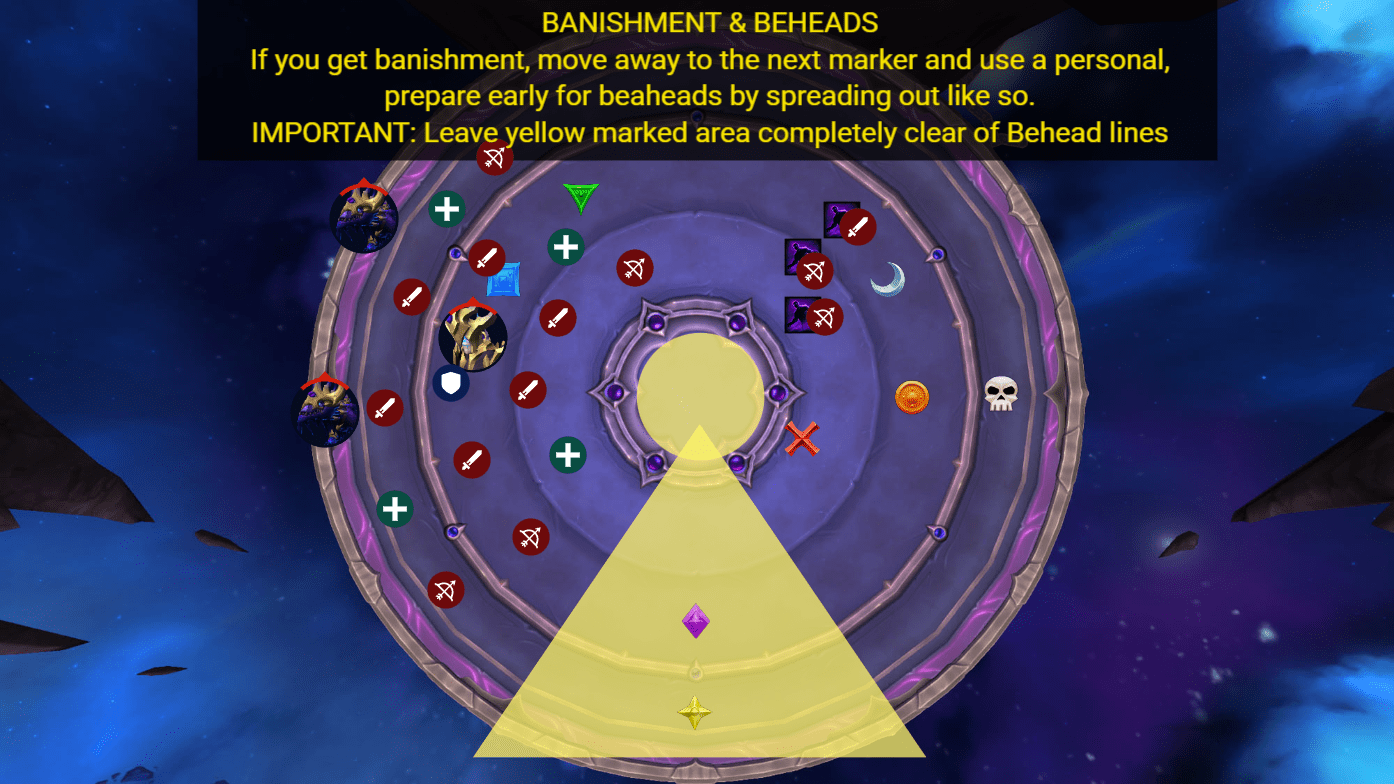
4) Behead & Banishment.
- Beheads strongly favour healers first, then DPS.
- Banishment heavily favours DPS, rarely healers.
Let your healers know so they can plan ahead and expect a Behead almost every time.
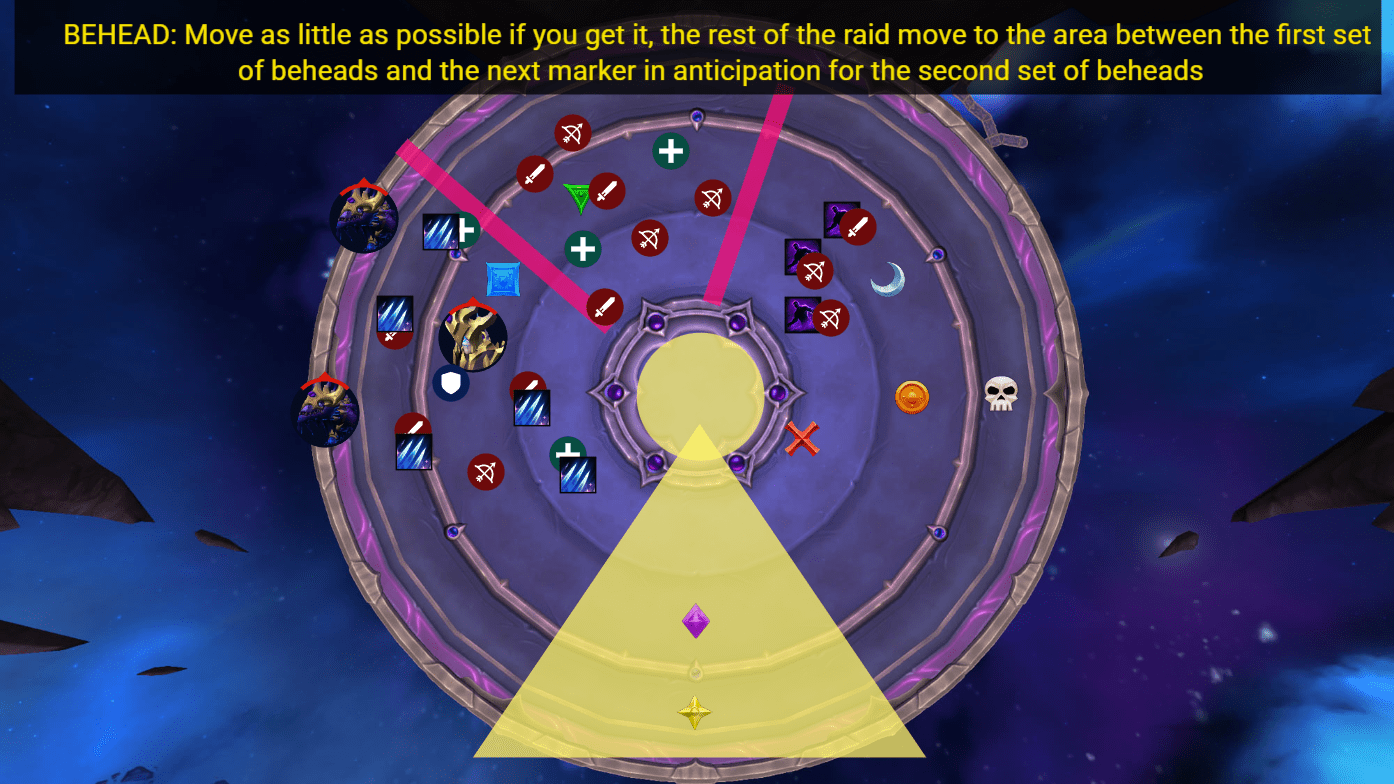
You will always get two sets of beheads back-to-back while you are having also two sets of banishments back-to-back, see the pic below for positioning. What applies at the start when we are near the blue marker also applies when we move to moon and so on.
5) If you get Banishment:
- You cannot get Behead.
- Move to the next marker to make room for Behead players.
- Use a personal — it does damage.
6) Ghosts are tricky — treat them carefully.
The safest way to handle them:
- Get distance from the boss, even as melee. Stop DPSing and just focus on the mechanic.
- Ghosts spawn around the boss, and the farther you are, the more forgiving they are when you turn to face them.
Tanks: tough luck. 😀
7) Mind control handling — Cyclone is your best friend.
If someone gets MC’d:
- Use Cyclone to CC them.
- They will need two Cyclones back-to-back because the MC lasts longer than one Cyclone.
- Our Resto Druid even macro’d Nature’s Swiftness + Cyclone to instantly save the MC’d player before they got cleaved.
It saves battle rezzes — incredibly useful during progress.
1st & 2nd Intermissions
Pretty straightforward. You can get either Position A or Position B (see pic below), depending on where the circles spawn.
Keep in mind that whatever happens in the 1st Intermission, the opposite will happen in the 2nd.
For example:
- If in the 1st Intermission you stack on the Star marker, then in the 2nd Intermission you will be stacking left of the Star marker.
- If on the 1st Intermission you get Beams 2 first and then Beam 1, then in the 2nd Intermission you will get the opposite sequence.
Dealing with the beams is easy:
If you get Beams 1 (facing towards the outside) → Beams 2 (facing towards the middle), you run to the middle with a speed buff and then use the portal to go back.
If you get Beams 2 → Beams 1, you stay where you are and then use the portal to go to the middle.
Just make sure you are properly stacked for both sequences.
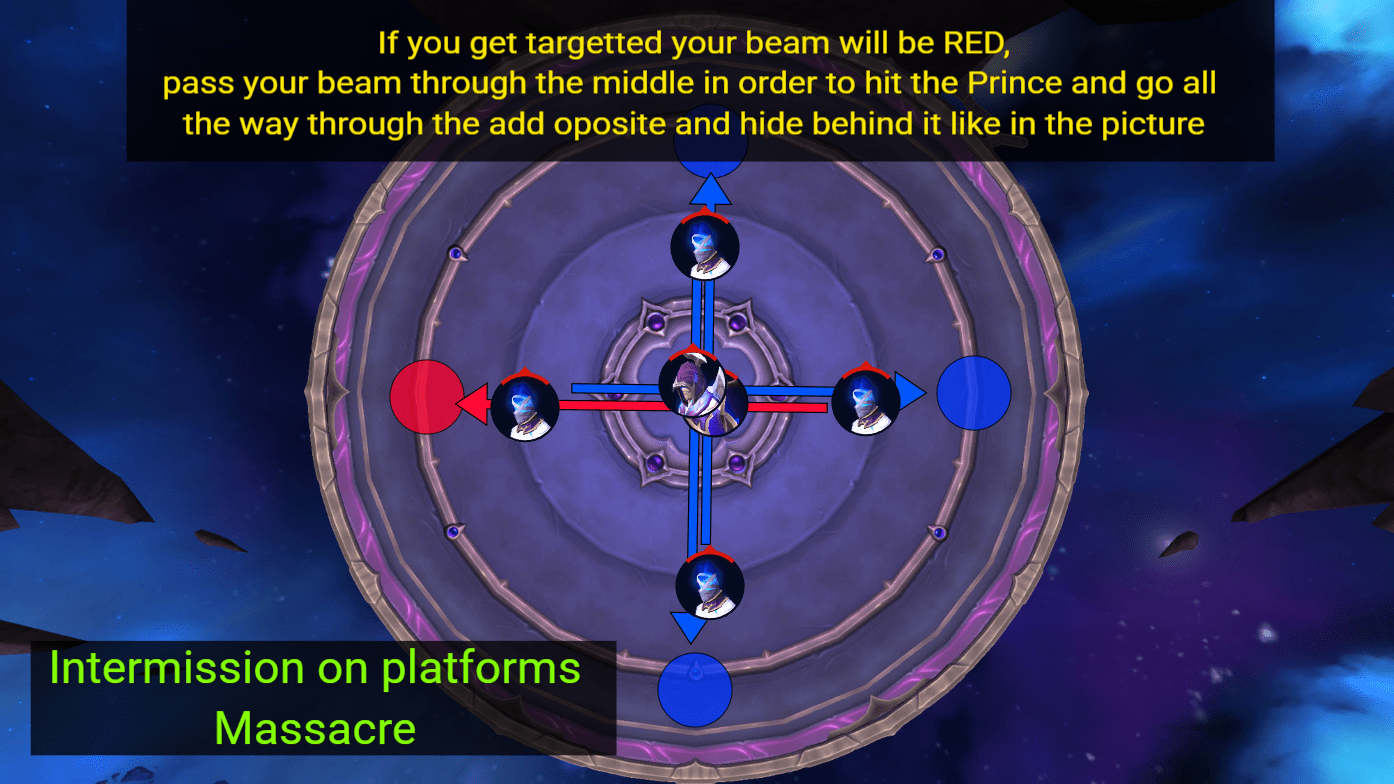
Platform Phase:
Again, nothing fancy here, make sure that you set up your interrupt rotation for the Prince and that all dps is funnelled to the Titan, the rest will die from cleave and Prince will die from cleave and massacres, below is a pic explaining how to position massacres.
If you happen to go to the platforms with 1 dps less make a call to use pots on that platform so you can push through and be able to progress the fight further.
Burn Phase
This phase is very similar to Heroic, with one key difference: at the end of the phase, the entire raid gets targeted with Behead.
Because of this, everyone needs to spread out at the end so you don’t cleave each other with your Beheads.
To make this easier — and to ensure full healing coverage across the raid — we assigned each player a numbered position (see pic below). This keeps the spread controlled and predictable and prevents anyone from drifting into someone else’s Behead line.
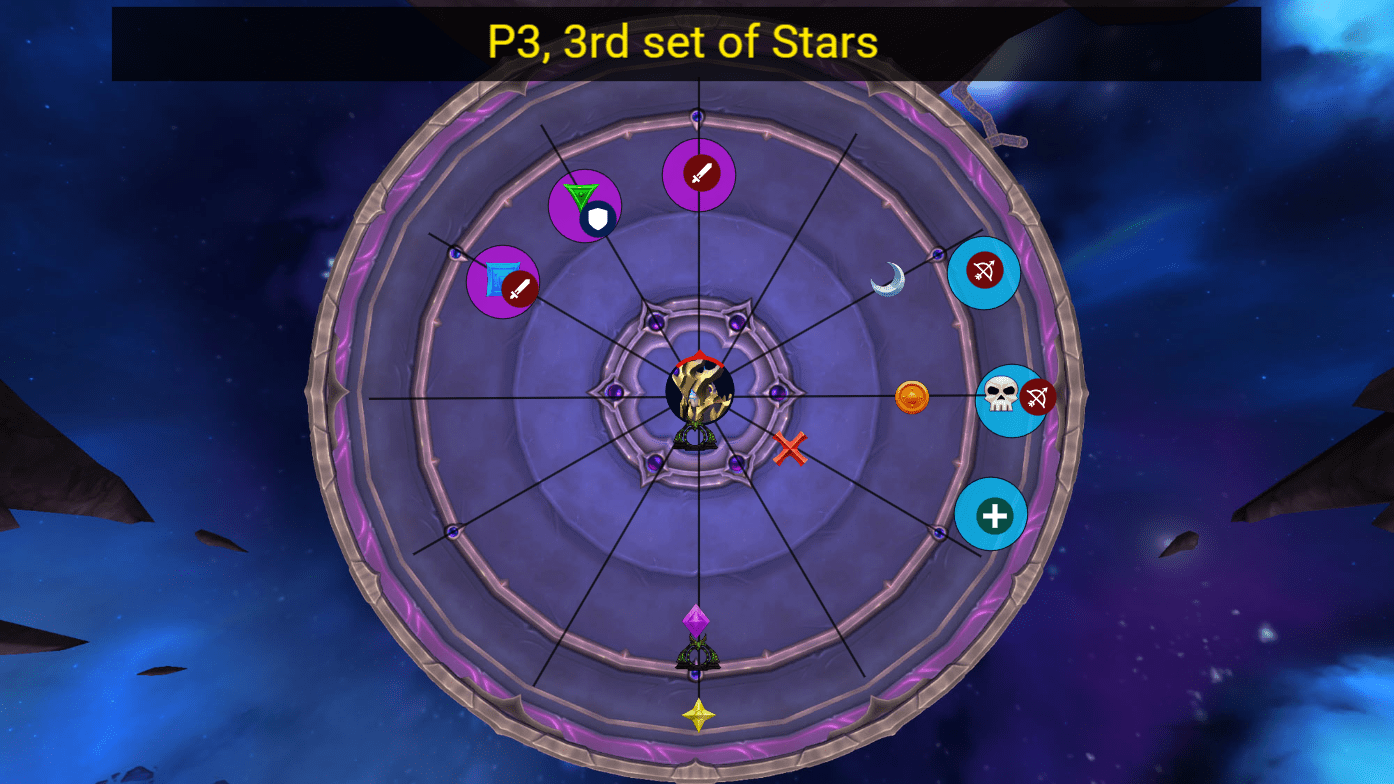
Phase 3
Try to reach the last phase as often as you can, even if half the raid is dead. The biggest challenge here is getting disoriented while dodging the spike rings coming from the stars — that’s where most people fall apart.
Rule of Thumb: Even though we originally said to move after the 3rd spikes, then after the 4th spikes, etc., the truth is simple: Do what works best for you and your class.
Your goal is to reach the middle of the room in one piece, and that timing looks different for every spec depending on mobility and defensives. Also, during the circles make sure you shift your camera to birds view angle (looking from the top) this will help you massively to see the gaps and make your way in.
For placing the debuffs and handling your Star Killer assignments, just follow the WeakAura prompts. After a few pulls, these will feel completely natural.
Keep in mind that for the debuffs, the WA will tell you which marker to go to based on whether you’re ranged or melee — but it will not tell you whether you are middle, left, or right on that marker.
A bit of communication here goes a long way, especially for the ranged players.
For melee, things are simpler: the tank will always take the middle, so the rest just fill in left and right accordingly.
Do not forget to leave enough space between each debuff to have properly aligned circles and to mitigate some of the fall off damage the debuff does when it drops the stars.
See pics below for optimal placements


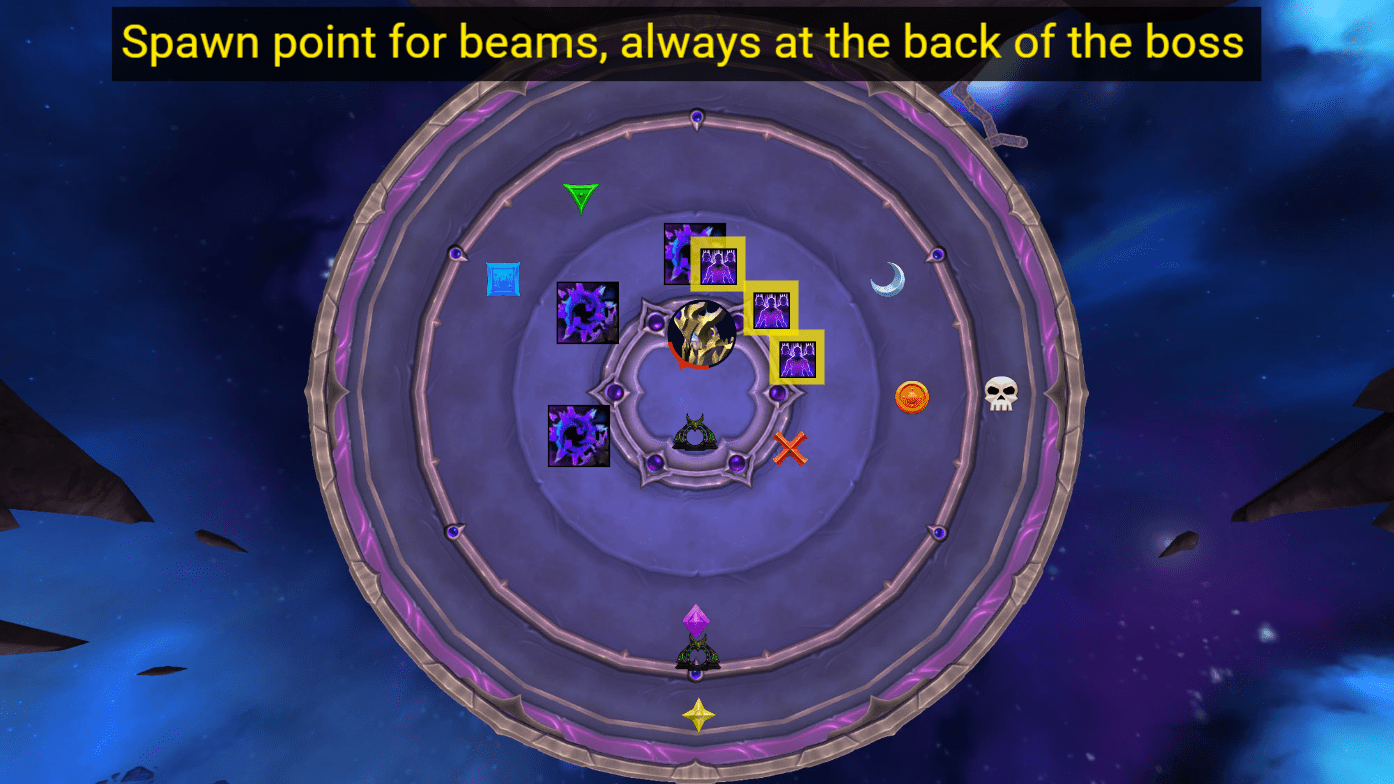
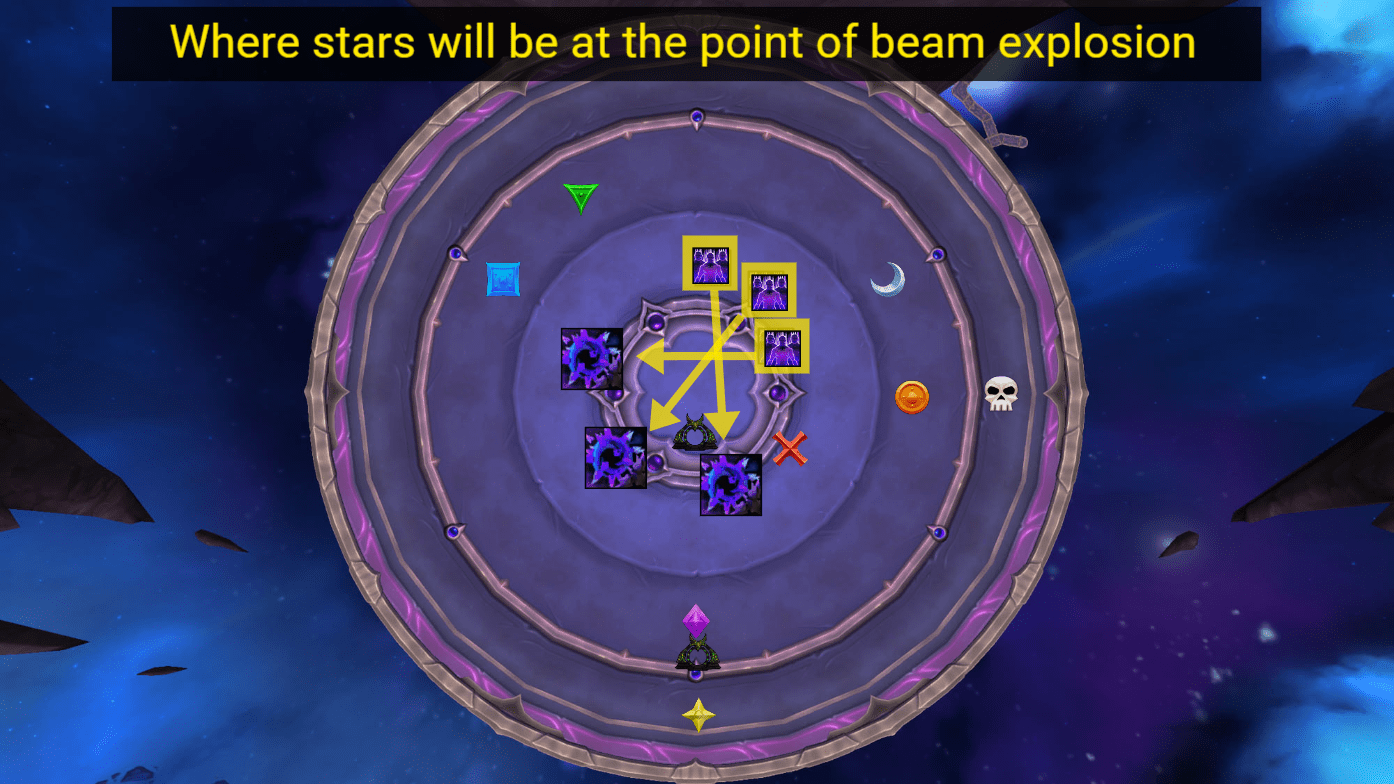
IMPORTANT: Tanks — Your Positioning Matters Here
There’s a small positioning trick that makes this phase far easier for the raid when lining up Star Killer on the stars.
The ghosts that the beams come from will always spawn on the boss’s back.
For example:
- If the stars are rotating counterclockwise,
your tank should force the boss to have his back facing the last star in the rotation (in the example, the top one). By the time the beams spawn and explode, the stars will have moved further along their path, giving everyone a much clearer view.
Obviously, if the stars are moving clockwise, you simply reverse this.
I hope all of the above will help you get your kill!
You can find my Raid Plans here:
https://raidplan.io/plan/zba9cxvtgsjsc2j8
https://raidplan.io/plan/8646vb7scv5fby2x
Here is also a link to the CD allocation sheet:
https://docs.google.com/spreadsheets/d/1xIXTWzOO6dtVbhmms2KFZRs1BLpq1-JM8nhzAyZtEMg/edit?usp=sharing
Also, if you have any questions feel free to join the Gordian Knot Discord Server here:
https://discord.gg/NyuK2QJY5k and give me a poke, my discord name and discord tag is Leleko.
I will be happy to answer any questions!
For guides and updates on our progress, follow us on social media:
Facebook:
https://www.facebook.com/GordianKnotEU/
https://www.facebook.com/groups/gordianknot/
Twitter:
https://x.com/GordianKnotEU
Instagram:
https://www.instagram.com/gordianknoteu/
TikTok:
https://www.tiktok.com/@gordianknoteu
If you’re looking to join one of the most active and friendly mythic raiding, World of Warcraft EU guild, feel free to apply here, or join our Discord and reach out to anyone with the rank of Officer or higher. We’d be delighted to welcome you to our ranks!
Also here’s a link from wowhead.

Add Comment
You must be logged in to post a comment.