

Vaelgor and Ezorrak Mythic Down!
Vaelgor and Ezorrak Mythic Down!
WoW Guild EU Mythic Progression
“Thank f*ck.” — Athlios, immediately after the kill.
To be fair, that pretty much sums this one up. 😄
A bit of a challenge, but on the bright side, being able to keep both bosses stacked for most of the fight and having frequent Void Orbs spawning made this a padding paradise, so at least that part was fun.
For this encounter we used 3 tanks, 4 healers and 13 DPS.
Our third tank was a Death Knight who switched to Blood specialization while keeping DPS trinkets and talents focused on maximising damage output. The two main tanks handled the standard tank mechanics, while the third tank was responsible for soaking Nullbeam alongside a main tank, controlling Void Orbs with Mass Grip, contributing additional boss damage, and tanking the intermission add.
Keep the Bosses Together
On Mythic difficulty, the drakes only fly during the intermissions, allowing you to keep the bosses relatively close together throughout the fight.
Keep in mind that the required 15-yard separation is measured from near the centre of each boss rather than from the edge of their hitboxes. This allows you to position them close enough for efficient cleave damage from the entire raid.
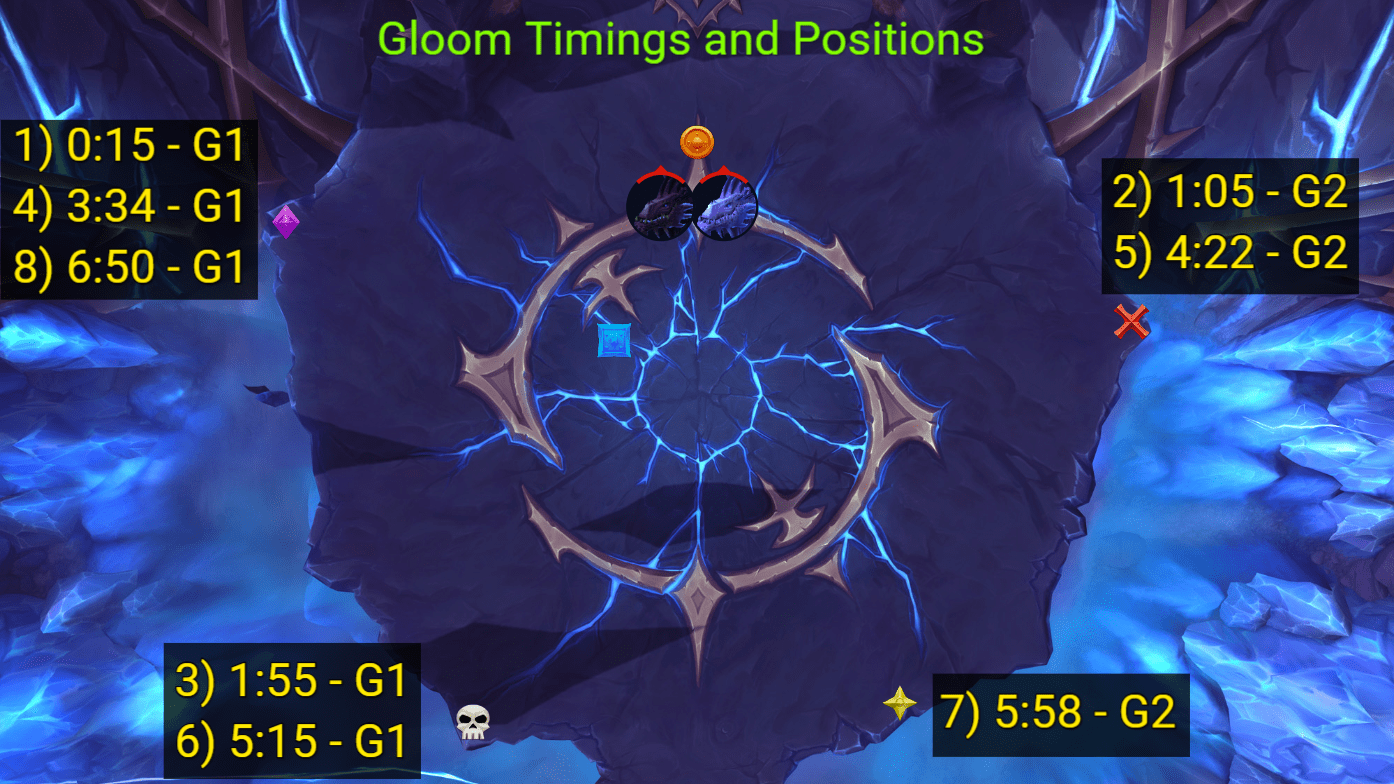
Gloom Soaks
Two teams of seven players are sufficient for all Gloom soaks. (The active tank is included in those 7 players)
Try to avoid assigning more than one melee player to each group. The 5-yard spacing requirement forces melee players out of range of the bosses, resulting in unnecessary DPS loss.
On Mythic, every player soaking must remain at least 5 yards apart. Fortunately, the Gloom sphere itself is quite large, allowing two players to soak from opposite sides without splashing damage onto one another.
See the image below for positions, timings, and group assignments.
Group 1 should also be aware of Tail Lash from Vaelgor. During the first and fourth Gloom casts, Tail Lash overlaps with the soak mechanic. Make sure your positioning accounts for this to avoid being knocked away while attempting to soak.
Nullbeam
For Mythic difficulty, have one of your main tanks and your third tank soak Nullbeam together. This guarantees that all stacks are absorbed, resulting in a significantly weaker pull from the rift.
A few important things to remember:
- The first player to break their tether triggers Nullscatter, creating a cascade of puddles that must be dodged.
- The last player to break their tether triggers Nullzone Implosion, causing significant raid-wide damage.
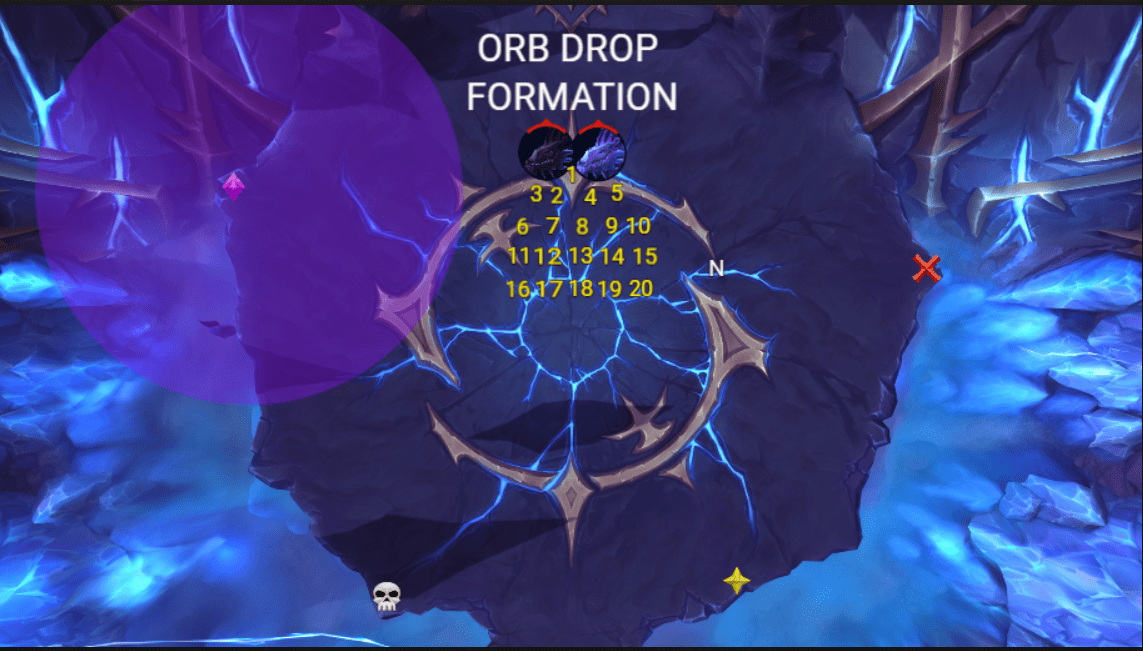
Voidhowl
This mechanic needs to be handled quickly and efficiently.
Stack tightly in front of the bosses without overlapping each other (see image below).
We used two Death Knights who alternated Mass Grips to gather the Void Orbs. Any orbs that spawned further away were handled with regular Death Grip.
Damage from Voidblots ramps up very quickly, so we also assigned AoE stuns to interrupt casts while the raid focused on killing them.
First Intermission
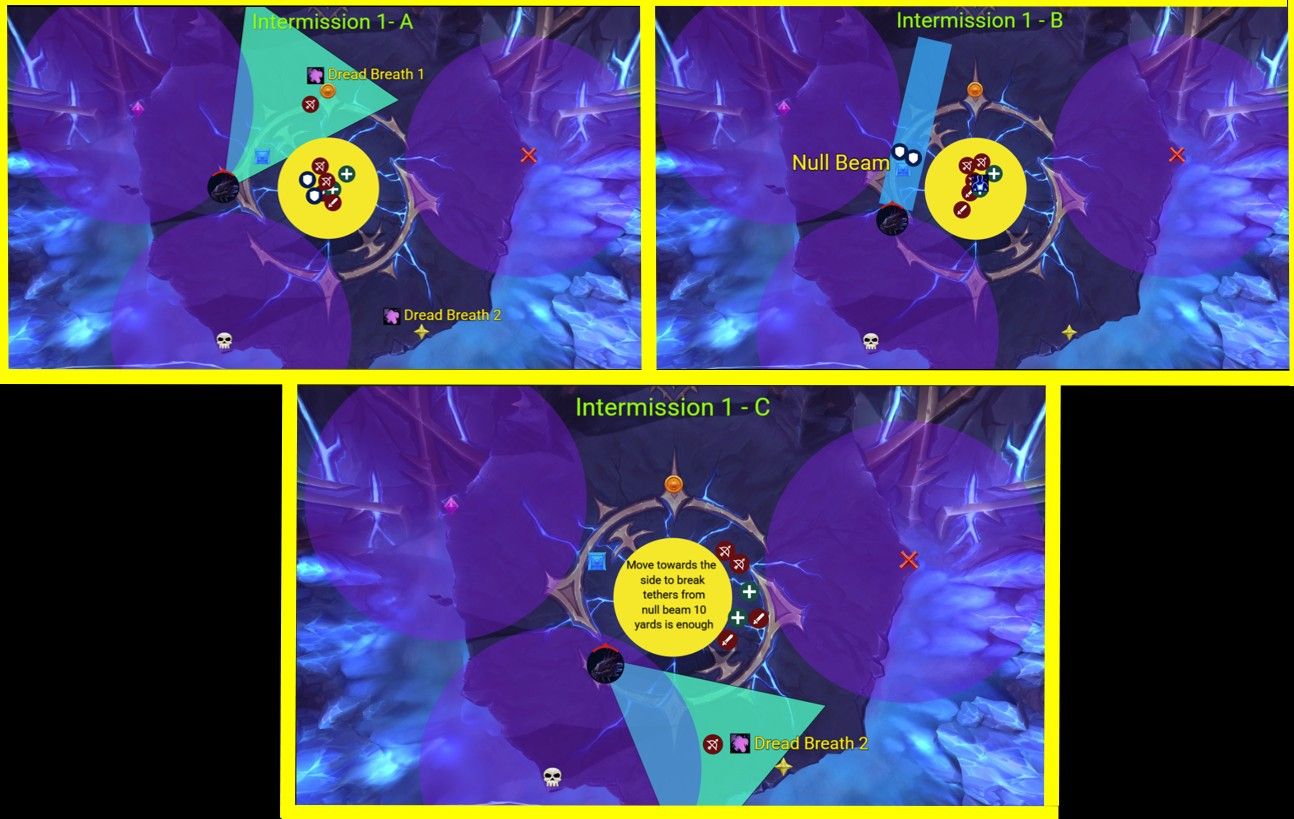
The sequence is:
Dread Breath → Nullbeam → Dread Breath
- Place the first Dread Breath towards Orange.
- Your two main tanks should soak the Nullbeam while the third tank holds the Manifestation of Midnight in the centre.
- Place the second Dread Breath towards Star.
One mechanic that caused us a lot of deaths early in progression was Shadowmark. Players affected by Shadowmark must move away from the raid immediately, as the debuff deals extremely heavy damage within an 8-yard radius.
Second Intermission
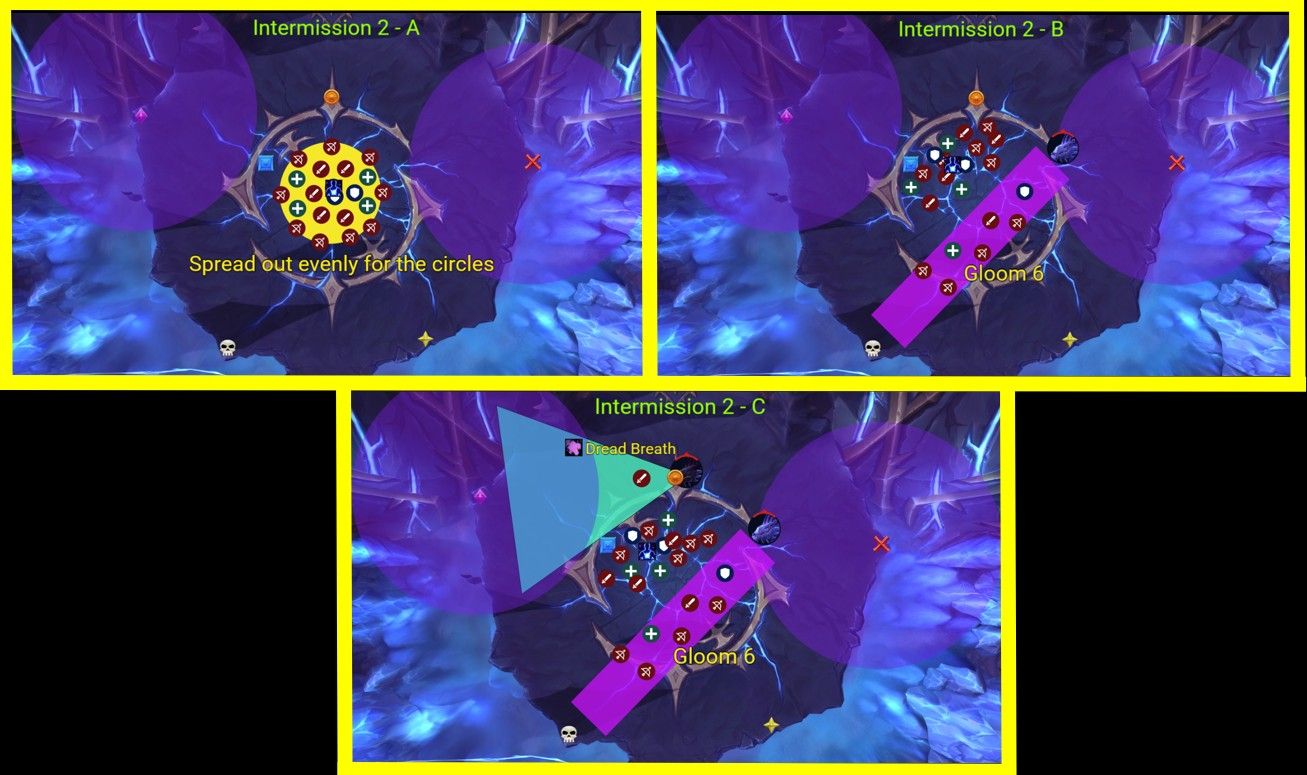
The sequence is:
Voidhowl → Gloom#6 → Dread Breath
- Voidhowl:
This overlaps with Shadowmark applications, meaning players need to spread quickly and cleanly.
Anyone affected by Shadowmark should move out of the Light area immediately to avoid unnecessary damage.
This is also one of the highest raid damage moments in the encounter, so make sure healing cooldowns are assigned here. - Gloom #6:
Call for all players not involved in the soak to clear the centre and move towards the sides of the room.
This gives Group 1 enough space to position correctly for the soak.
Gloom #6 should be aimed from the tank towards Skull. - Dread Breath:
Immediately after the Gloom soak, Vaelgor’s image will spawn near Orange and target a player with Dread Breath.
Final Burn
One final tip for this fight: once both drakes reach roughly 12–13% health, commit fully to Ezorrak and get him down as quickly as possible.
In our kill, Vaelgor was left at approximately 6% health when Ezorrak died. Although Vaelgor gains additional damage once his counterpart falls, the benefit of completely removing Gloom from the encounter far outweighs the increased damage intake.
The final few percent of Vaelgor become significantly simpler without having to manage additional Gloom soaks, allowing the raid to focus entirely on surviving and finishing the encounter.
As usual, if you want a copy of the raid plan, feel free to grab it from the link here.
For guides and updates on our progress, follow us on social media:
Facebook:
https://www.facebook.com/GordianKnotEU/
https://www.facebook.com/groups/gordianknot/
Twitter:
https://x.com/GordianKnotEU
Instagram:
https://www.instagram.com/gordianknoteu/
TikTok:
https://www.tiktok.com/@gordianknoteu
If you’re looking to join one of the most active and friendly mythic raiding, World of Warcraft EU guild, feel free to apply here, or join our Discord and reach out to anyone with the rank of Officer or higher. We’d be delighted to welcome you to our ranks!
Also here’s a link from wowhead.

Add Comment
You must be logged in to post a comment.